Warning:
The IWAAC Kerberos SSO add-on is being discontinued as of January 1st, 2021
Following
Atlassian's announcement to put an end to the Atlassian Server product line, we are very sorry to inform our customers that both the IWAAC Kerberos SSO add-on and the ODCC add-on are being discontinued as of January 1st, 2021. There will be no updates to our products from now on but we will answer to support requests until the end of year 2021.
If you use the IWAAC Kerberos SSO add-on and plan to replace your Atlassian Server applications with Atlassian Data Center applications, we recommend that you configure
SSO for Atlassian Data Center applications which is natively provided by Atlassian on its Data Center product line. In that scenario, your users will be redirected to your Identity Provider (e.g. Microsoft Azure AD, Microsoft ADFS, PingIdentity) for Windows Integrated / Kerberos authentication.
If you use the ODDC add-on and plan to replace your Crowd Server with Crowd Data Center, we recommend that you use
Crowd's native Azure Active Directory Connector for user and group management. You may also want to configure Atlassian's native
SSO for Atlassian Data Center applications on each of your Data Center applications for user authentication. In that scenario, your users will be redirected to Azure AD for password or Multi-Factor authentication.
Feel free to contact us at
support@cleito.com if you have any questions about those recommendations.
Overview

Cleito IWAAC is a simple plugin that you install on each application relying upon Atlassian Crowd for user management (e.g. Confluence, Jira, Bitbucket, Bamboo, FishEye, Crucible).
The IWAAC plugin connects to your Active Directory Domain Controller and to your Crowd server to get Crowd SSO tokens for your AD domain users.
Info:
Installation Modes
Prior to version 2.0, the IWAAC plugin was only available as a generic Java archive that needed to be installed in the lib folder of Bitbucket's Tomcat server. Starting from version 2.0, IWAAC is also available as a standard add-on for Bitbucket, which can be installed and managed in Bitbucket's administration UI.
If you are planning to install and configure the IWAAC plugin as a standard add-on for Bitbucket, please stay on this page and follow the instructions.
If you are planning to install and configure the IWAAC plugin as a generic Java archive for Tomcat-based applications like Bitbucket (only available for Bitbucket versions prior to 5.0), please go to this page.
Prerequisites
- The very first prerequisite before installing and configuring IWAAC is to make sure that Bitbucket is already integrated with your Crowd Server and that Crowd SSO is fully up and running. Please go to the Atlassian documentation for more details about the installation and integration of Atlassian Crowd with your Bitbucket instance.
- Please also check that the usernames in Crowd are identical to the usernames in Active Directory. For instance, if John Doe's AD logon name is john_doe@YOURDOMAIN.COM (or YOURDOMAIN\john_doe), then his username in Crowd has to be john_doe (or jOhn_Doe as it is not case-sensitive). This is a most-likely case since you probably linked Bitbucket to an Active Directory / LDAP Directory Connector in Crowd's administration console. If you did not and configured an Internal, Delegated Authentication, Remote Crowd or Custom Directory Connector instead, you might want to configure the IWAAC properties so that the plugin automatically creates authenticated Active Directory domain users in the corresponding Crowd directory (if those users do not already exist in this very directory).
System requirements
IWAAC
- Cleito IWAAC 2.0 and later
End-user computer
- Any computer running Microsoft Windows (XP, Vista, 7, 8, 8.1, 10) or Mac OS[1] (10.10 and later) and belonging to your enterprise Windows Domain
- Microsoft Internet Explorer, Microsoft Edge, Mozilla Firefox, Google Chrome and Apple Safari are supported web browsers
1. Please follow these instructions to add a Mac to an Active Directory domain.
Windows domain
- Active Directory Domain Services for Windows Server (2008 R2, 2012 R2, 2016, 2019)
Info:
About Active Directory topologyBoth single and multiple domains are supported. However, for simplicity reasons, the rest of this documentation only details the installation and configuration of IWAAC in a single Active Directory domain environment.
Please email us at support@cleito.com for specific instructions on deploying IWAAC in a multi-domain environment.
Crowd server
- Atlassian Crowd 2.1 and later (up to v4.2)
Bitbucket server
- JDK 7, JDK 8 (except JDK 1.8.0_40 and 1.8.0_45), JDK 11
- Windows, Linux and Mac OS are supported Operating Systems
- For testing purposes, do not install Bitbucket on your end-user client computer as in such a case your browser might use the unsupported NTLM protocol instead of Kerberos
Info:
How to check your JDK version
In a shell or terminal window, type
- On Windows: %JAVA_HOME%\bin\java.exe -version or java.exe -version
- On Linux or Mac OS: $JAVA_HOME/bin/java -version or java -version
Firewall rules
Your Bitbucket server must be able to connect to
- the Crowd server (default HTTP port 8095 or HTTPS port 8443)
- at least one of your Active Directory Domain Controllers (TCP/UDP on port 88 for Kerberos, TCP/UDP on ports 389 and 636 for LDAP and LDAPS connections)
Setting up IWAAC Kerberos SSO
-
If you are running JDK 11, please edit bin/_start-webapp.sh (Linux, Mac OS) or bin/_start-webapp.bat (Windows) and insert the following at the beginning of the file. Then restart Bitbucket.
On Linux or Mac OS:
#!/usr/bin/env bash

JAVA_OPTS="-Datlassian.org.osgi.framework.bootdelegation.extra=sun.*,com.sun.* $JAVA_OPTS"
On Windows:
@echo off

set JAVA_OPTS=%JAVA_OPTS% -Datlassian.org.osgi.framework.bootdelegation.extra=sun.*,com.sun.*
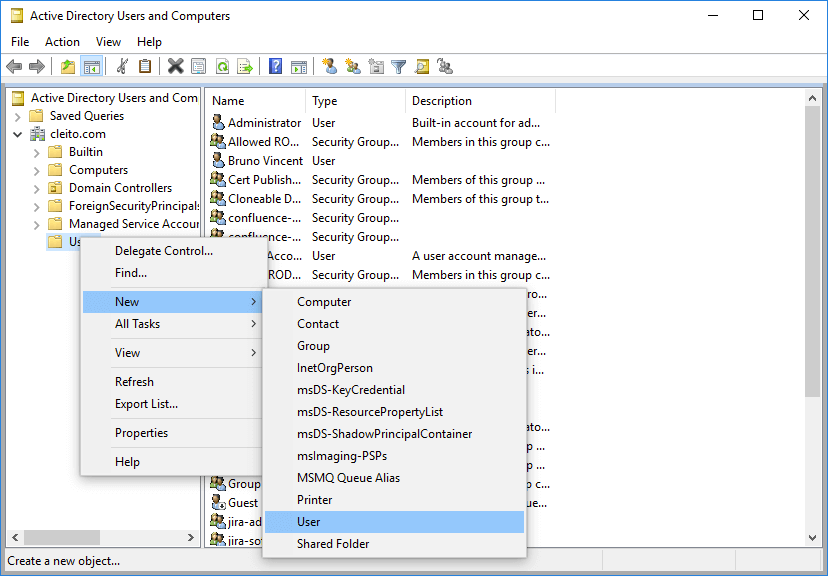
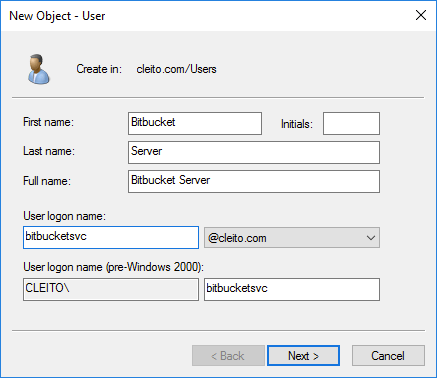
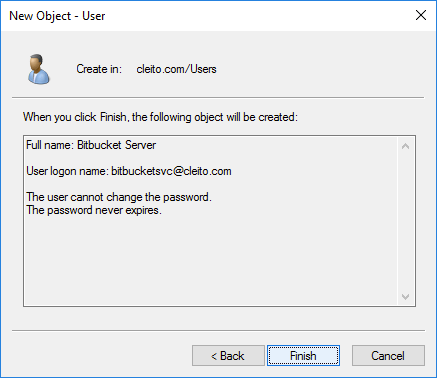
- Then you must ask an AD domain administrator to create a user account for your Bitbucket server in Active Directory, for instance bitbucketsvc@YOURDOMAIN.COM
Warning:
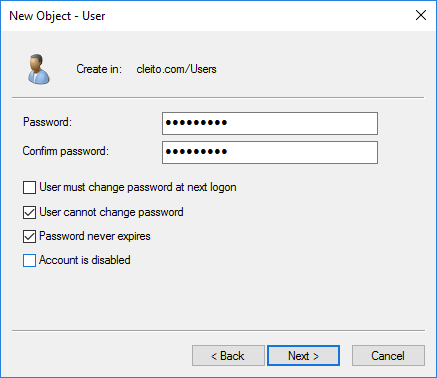
Please make sure to type a very long and complex password and then check User cannot change password and Password never expires
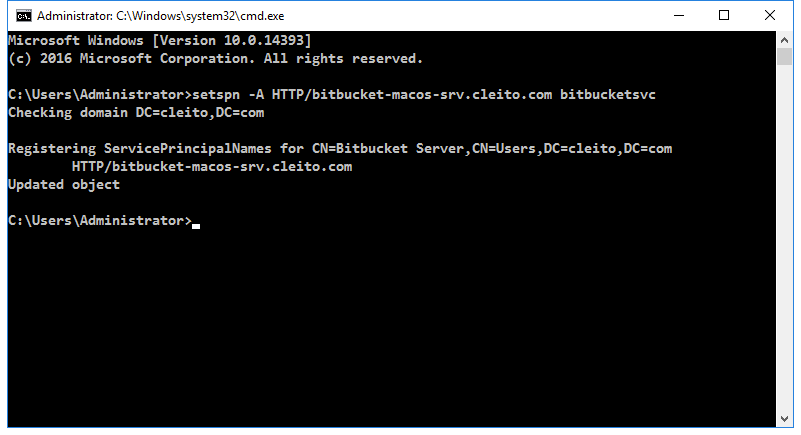
- Then ask your AD domain administrator to set a Service Principal Name (SPN) for your Bitbucket server. The Fully Qualified Domain Name (FQDN) to be used MUST be the Host (A) record of your Bitbucket server in Active Directory DNS.
setspn -A HTTP/<bitbucket_server_fqdn> <bitbucket_server_username>
For instance:
setspn -A HTTP/bitbucket-macos-srv.cleito.com bitbucketsvc
Warning:
Please note that the HTTP/ string refers to the Kerberos HTTP service class which differs from the HTTP protocol. Both the HTTP protocol and the HTTPS protocol use the Kerberos HTTP service class. You should thus always use the HTTP/ string in the command above, even if Bitbucket's URL begins with https:// rather than http://.
Info:
About Bitbucket server's FQDN
Throughout the installation process, the Fully Qualified Domain Name (FQDN) of your Bitbucket server
MUST be the
Host (A) record of this server in Active Directory DNS. Depending on your DNS configuration, it might be different from the hostname your users type in their browser address bar when accessing to Bitbucket.
Please use the
Resolve-DnsName command in a Powershell command prompt to determine the Host (A) record of your server.
Resolve-DnsName -Name "hostname_in_bitbucket_url"
For instance:
Resolve-DnsName -Name "bitbucket.cleito.com"

Info:
What if you run Bitbucket behind Apache, a reverse proxy or a load balancer?
If you run Bitbucket behind a reverse proxy or a load balancer, you MUST use the FQDN (Host (A) record) of the URL's hostname when running the setspn command. For instance:
setspn -A HTTP/reverseproxy-bitbucket-vip.cleito.com bitbucketsvc
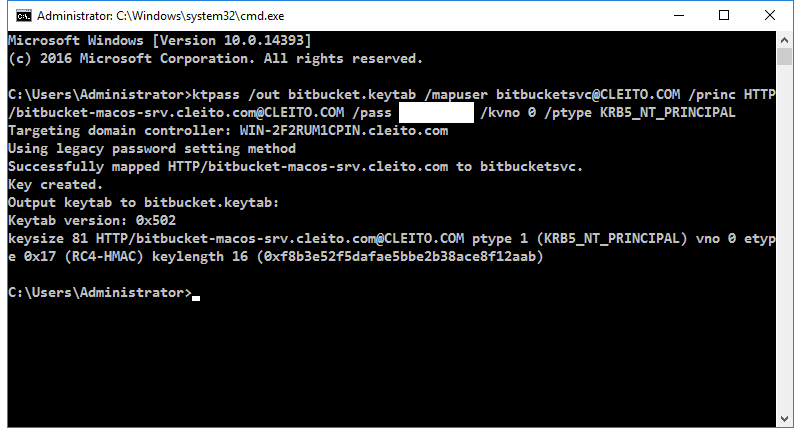
- Finally ask your AD domain administrator to generate a keytab file for your Bitbucket server. A keytab file is a piece of cryptographic information that will enable the IWAAC plugin to validate responses to Kerberos authentication challenges. Please be careful while typing this command as it is case sensitive.
ktpass /out <keytab_filename> /mapuser <bitbucket_server_username>@<YOURDOMAIN.COM> /princ HTTP/<bitbucket_server_fqdn>@<YOURDOMAIN.COM> /pass <bitbucket_server_userpassword> /kvno 0 /ptype KRB5_NT_PRINCIPAL
For instance:
ktpass /out bitbucket.keytab /mapuser bitbucketsvc@CLEITO.COM /princ HTTP/bitbucket-macos-srv.cleito.com@CLEITO.COM /pass bitbucketServerUserPassword /kvno 0 /ptype KRB5_NT_PRINCIPAL
Info:
About Kerberos encryption types
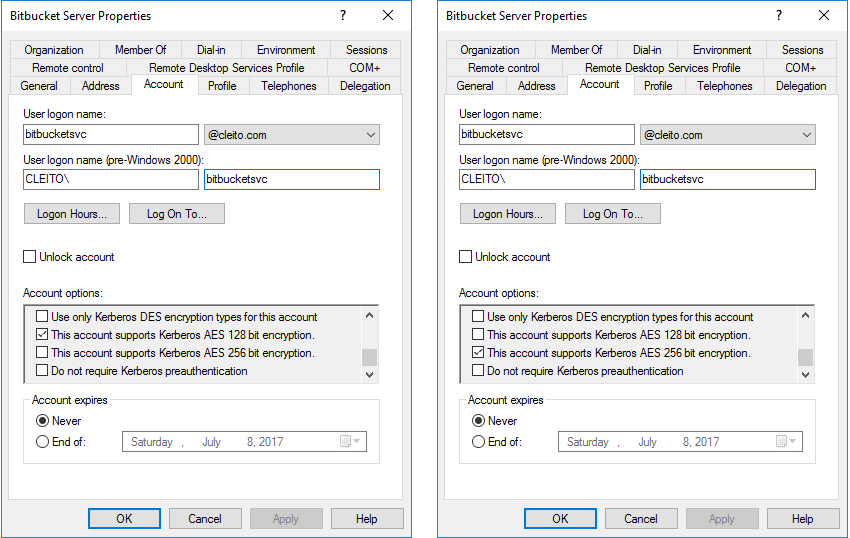
By default,
ktpass will generate a
keytab file using the RC4 cryptographic algorithm.
If you prefer to use AES-128 or AES-256 for security reasons, you will need to enable these encryption types in the Windows account of your Bitbucket server
before running the previous
ktpass command with the following option:
/crypto AES128-SHA1 or
/crypto AES256-SHA1.
If you choose to use AES-256 and your JDK version is prior to 1.8.0_161, you will also need to install the JCE Unlimited Strength Jurisdiction Policy Files in your environment:
a. Download the files and instructions for
Java 7 or
Java 8.
b. Remove the following JAR files from your
$JAVA_HOME/jre/lib/security directory (or
%JAVA_HOME%\jre\lib\security on Windows):
local_policy.jar and
US_export_policy.jar.
c. Replace these two files with the ones included in the JCE Unlimited Strength Jurisdiction Policy Files download.
Info:
What if you run Bitbucket behind Apache, a reverse proxy or a load balancer?
If you run Bitbucket behind a reverse proxy or a load balancer, you MUST use the FQDN (Host (A) record) of the URL's hostname when running the ktpass command. For instance:
ktpass /out bitbucket.keytab /mapuser bitbucketsvc@CLEITO.COM /princ HTTP/reverseproxy-bitbucket-vip.cleito.com@CLEITO.COM /pass bitbucketServerUserPassword /kvno 0 /ptype KRB5_NT_PRINCIPAL
Then use the same keytab file that you have just generated for all applications (e.g. Jira, Confluence) running behind the same reverse proxy's A record.
- (Optional) If you did not link Bitbucket to an Active Directory / LDAP Directory Connector in Crowd and if you plan to enable automatic user creation, you will have to perform this extra step. Go to the delegation tab of the Windows user you created for your Bitbucket server and click on Trust this user for delegation to specified services only and then click on Use Kerberos only. Then click on Add. Then click on Users or Computers, type the name of your AD domain controller and click on Check Names. Then select the ldap service and click on OK. Finally click on Apply and then on OK.
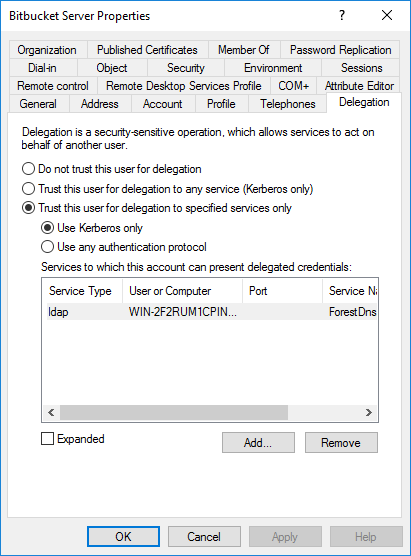
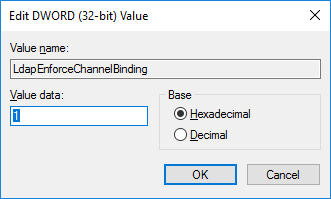
Still in the case where you did not link Bitbucket to an Active Directory / LDAP Directory Connector in Crowd and you plan to enable automatic user creation, you will also have to add the [HKEY_LOCAL_MACHINE\SYSTEM\CurrentControlSet\Services\NTDS\Parameters\LdapEnforceChannelBinding] registry key on your Active Directory Domain Controller and set its value to 1 as detailed in Microsoft's documentation.

- On your Bitbucket server, create a file named iwaac-init.properties in the atlassian-bitbucket/WEB-INF/classes folder (for Bitbucket versions prior to 5.0) or in the app/WEB-INF/classes folder (for Bitbucket versions starting from 5.0). This file must contain only one property named iwaac.home whose value is the absolute directory path where IWAAC will store its configuration.
For instance, on Linux:
iwaac.home=/var/bitbucket/iwaac-home
On Mac OS:
iwaac.home=/Users/Bruno/bitbucket/iwaac-home
On Windows:
iwaac.home=C:\\data\\bitbucket\\iwaac-home
- Move/copy the keytab file that was previously generated by your Active Directory domain administrator to the iwaac.home directory you have just chosen

- Now, download and unzip the CLEITO IWAAC archive somewhere on your Bitbucket server.
- Then go to the conf/IWAAC folder of the unzipped archive and run setup_plugin.sh (Linux, Mac OS) or setup_plugin.bat (Windows) in a shell or terminal window:
 IWAAC Kerberos SSO Setup
------------------------
[Java Version] 1.8.0_111
[Iwaac] Enter iwaac.home directory path (e.g. /var/iwaac-home, C:\\data\\iwaac-home): <iwaac_home_directory_path>
[Kerberos] Enter your Windows domain name (e.g. DOMAIN.LOCAL): <YOURDOMAIN.COM>
[Kerberos] Enter the Fully Qualified Domain Name (FQDN) of your Active Directory Domain Controller (e.g. dcsrv.domain.local): <ad_domain_controller_fqdn>
[Kerberos] Enter the Fully Qualified Domain Name (FQDN) of the server hosting your application. This FQDN MUST be the A record of the server in Active Directory DNS (e.g. linuxsrv001.domain.local): <bitbucket_server_fqdn>
[Kerberos][INFO] Setting Service Principal Name: HTTP/<bitbucket_server_fqdn>@<YOURDOMAIN.COM>
[Kerberos] Enter Kerberos keytab filename (e.g. mykeytab.keytab): <keytab_file_name>
[Crowd] Enter Crowd Server URL (e.g. http://crowdsrv.domain.local:8095/crowd): <crowd_server_url>
[Crowd] Enter application name as defined in Crowd administration console (e.g. jirasdk): <application_name>
[Crowd] Enter application password as defined in Crowd administration console (e.g. ********): <application_password>
IWAAC Kerberos SSO Setup completed without an error
For instance:
IWAAC Kerberos SSO Setup
------------------------
[Java Version] 1.8.0_111
[Iwaac] Enter iwaac.home directory path (e.g. /var/iwaac-home, C:\\data\\iwaac-home): /Users/Bruno/bitbucket/iwaac-home
[Kerberos] Enter your Windows domain name (e.g. DOMAIN.LOCAL): CLEITO.COM
[Kerberos] Enter the Fully Qualified Domain Name (FQDN) of your Active Directory Domain Controller (e.g. dcsrv.domain.local): win-2f2rum1cpin.cleito.com
[Kerberos] Enter the Fully Qualified Domain Name (FQDN) of the server hosting your application. This FQDN MUST be the A record of the server in Active Directory DNS (e.g. linuxsrv001.domain.local): bitbucket-macos-srv.cleito.com
[Kerberos][INFO] Setting Service Principal Name: HTTP/bitbucket-macos-srv.cleito.com@CLEITO.COM
[Kerberos] Enter Kerberos keytab filename (e.g. mykeytab.keytab): bitbucket.keytab
[Crowd] Enter Crowd Server URL (e.g. http://crowdsrv.domain.local:8095/crowd): http://crowd.cleito.com:8095/crowd
[Crowd] Enter application name as defined in Crowd administration console (e.g. jirasdk): bitbucket
[Crowd] Enter application password as defined in Crowd administration console (e.g. ********): ********
IWAAC Kerberos SSO Setup completed without an error
- The setup_plugin script has generated four configuration files
- jaas.conf: This file is used by IWAAC for Kerberos implementation. In most cases, it should not be edited.
- krb5.conf: This file is also used by IWAAC for Kerberos implementation. In most cases, it should not be edited.
- crowd.properties: This file is used by IWAAC to connect to the Crowd server. There are several options available that are detailed in the Configuration options section.
- iwaac.properties: This file is used by IWAAC to restrict its functions to specific user agents, ip addresses, users or URLs. For example, you might want to keep an usual username and password authentication on the /rest URL. Or for performance reasons, you might want IWAAC to automatically authenticate your Active Directory domain users only when they hit Bitbucket's login page. This file is also used by IWAAC to connect to Active Directory in the case of fallback to basic authentication. All the options are detailed in the Configuration options section. See also the section titled Tuning for production for recommended settings values.
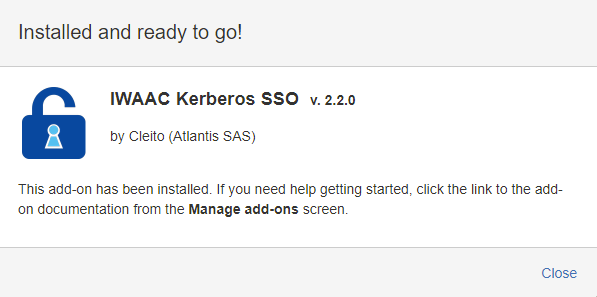
- Finally go to Bitbucket's administration UI, select Add-ons, then Manage add-ons and click on Upload add-on.

Click Choose File and upload the CLEITO-IWAAC-PLUGIN-2.2.0.jar file from the lib folder of the unzipped archive.
Close your browser or log out of Bitbucket.
- Follow the browser configuration instructions before trying to login again.
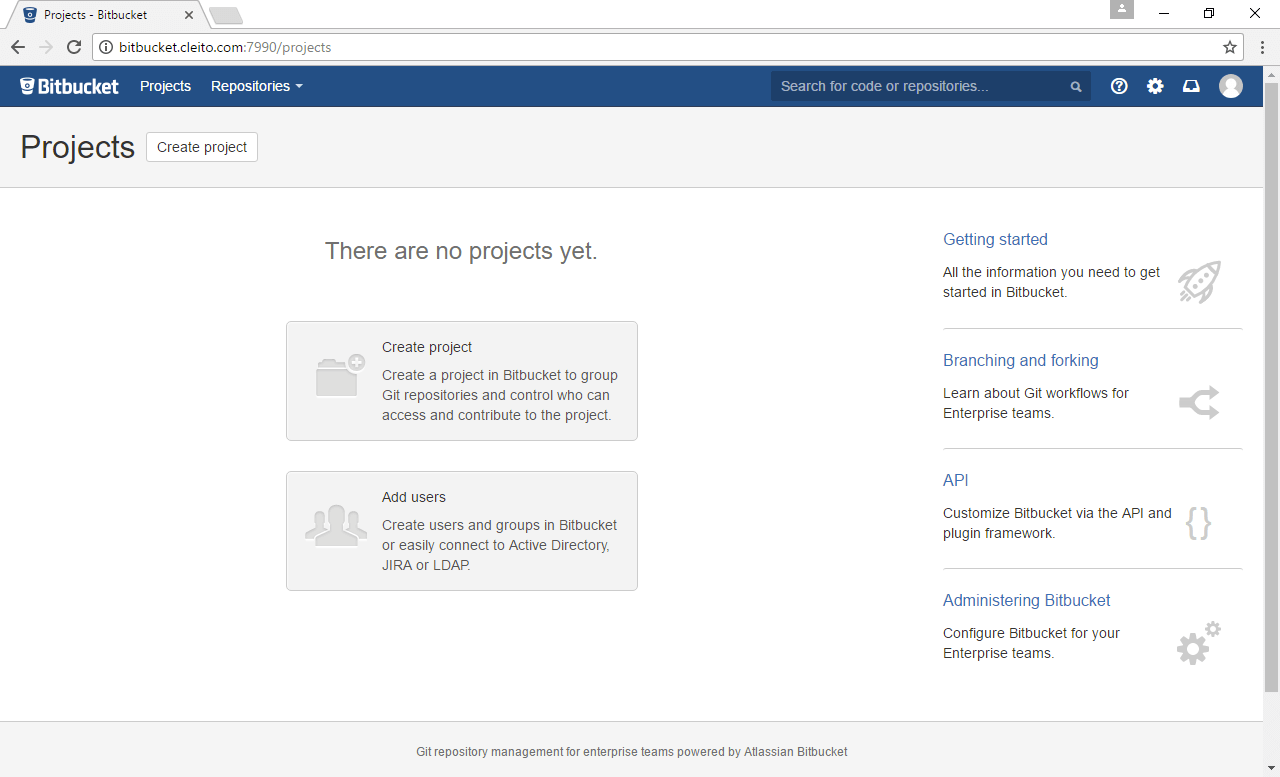
- Now, open your web browser and enter Bitbucket's URL, e.g. http://bitbucket.yourdomain.com.
Congratulations, you are already authenticated!
If this installation procedure does not seem to work in your environment, please check the troubleshooting section.
Info:
What if you want to login as a different user?
There might be cases where you would like to login as another user than the current Active Directory domain user. In such a case, follow the configuration instructions of the section titled
Tuning for production, then open your web browser and type Bitbucket's login page URL with the following extra parameter:
cleito-iwaac-auth=falseFor instance:
http://bitbucket.yourdomain.com/login?cleito-iwaac-auth=false
Browser configuration
The browsers of your Active Directory domain users must be configured so as to automatically respond to Kerberos authentication challenges. In the next section, we describe how to manually configure some of the most popular corporate web browsers. This manual configuration can be automated by your Active Directory domain administrator with a Group Policy Object.
Windows clients
Microsoft Internet Explorer
- Open Internet Explorer, then click Tools > Internet options > Security > Local intranet > Sites and click Advanced
- Add your domain extension to the Local intranet zone, for instance http://*.yourdomain.com and/or https://*.yourdomain.com

Mozilla Firefox
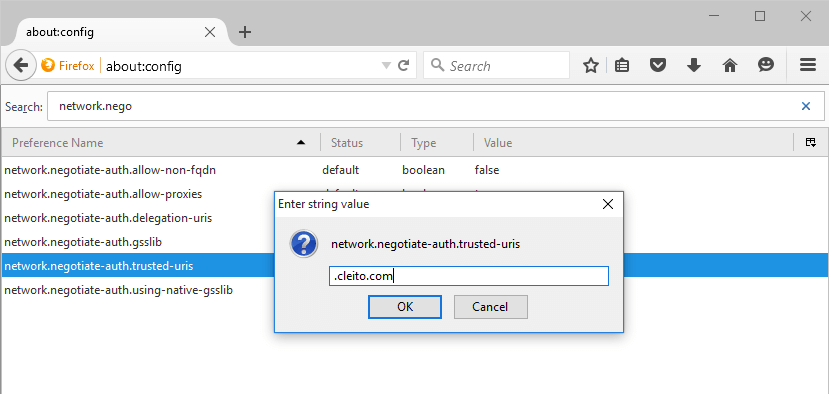
- Open Firefox, then type about:config in the adress bar and click I'll be careful, I promise!
- Type network.negotiate-auth.trusted-uris in the filter bar and set this setting to .yourdomain.com
- (Optional) If you did not link your application to an Active Directory / LDAP Directory Connector in Crowd and if you plan to enable automatic user creation, you will also have to set the network.negotiate-auth.delegation-uris property to .yourdomain.com
Google Chrome
Google Chrome's support for Kerberos authentication relies on Internet Explorer's configuration. Please follow
configuration instructions for Internet Explorer and then start Google Chrome.
If Internet Explorer does not seem to be installed on your workstation, click
Start Menu >
Control Panel >
Network and Internet >
Internet Options >
Security >
Local intranet >
Sites >
Advanced. Then add your domain extension to the Local intranet zone, for instance
http://*.yourdomain.com
(Optional) If you did not link Bitbucket to an
Active Directory / LDAP Directory Connector in Crowd and if you plan to enable automatic user creation, you will also have to edit the
[HKEY_LOCAL_MACHINE\SOFTWARE\Policies\Google\Chrome\AuthNegotiateDelegateWhitelist] registry key on your workstation and set its value to
*.yourdomain.com

If you cannot find that registry key, please follow these steps:
- Download the policy templates from https://dl.google.com/dl/edgedl/chrome/policy/policy_templates.zip
- Run gpedit.msc to open the local group policy management
- Go to Local Computer Policy > Computer Configuration > Administrative Templates and right click on Administrative Templates
- Click Add/Remove Templates, then click the Add button and select windows/adm/en-US/chrome.adm from the unzipped policy_templates archive you previously downloaded
- Go to Local Computer Policy > Computer Configuration > Administrative Templates > Classic Administrative Templates (ADM) > Google > Google Chrome > Policies for HTTP Authentication > Kerberos delegation server whitelist
- On the Kerberos delegation server whitelist window, click Enabled and enter *.yourdomain.com in the field named Kerberos delegation server whitelist
- Then restart Chrome and type chrome://policy in the address bar
- Check that you now see the AuthNegotiateDelegateWhitelist key in Windows registry editor
Microsoft Edge
Microsoft Edge's support for Kerberos authentication relies on Internet Explorer's configuration. Please follow
configuration instructions for Internet Explorer and then start Microsoft Edge.
If Internet Explorer does not seem to be installed on your workstation, click
Start Menu >
Control Panel >
Network and Internet >
Internet Options >
Security >
Local intranet >
Sites >
Advanced. Then add your domain extension to the Local intranet zone, for instance
http://*.yourdomain.com
Mac OS clients
Warning:
By default, the setup_plugin script only enables Cleito IWAAC for Windows clients.
If you want to enable Cleito IWAAC for Mac OS clients that belong to your Active Directory domain, you need to edit the
iwaac.agent.include.only property in the
iwaac.properties file:
iwaac.agent.include.only Windows NT, Mac OS
Then disable the IWAAC plugin in Bitbucket's administration UI and enable it again to take your changes into account.
Apple Safari
Cleito IWAAC works out of the box on Safari and does not require any further configuration.
Mozilla Firefox
- Open Firefox, then type about:config in the adress bar and click I'll be careful, I promise!
- Type network.negotiate-auth.trusted-uris in the filter bar and set this setting to .yourdomain.com
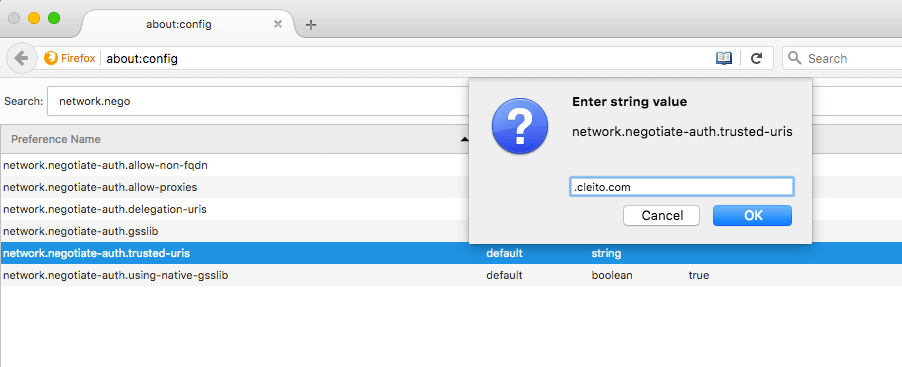
- (Optional) If you did not link your application to an Active Directory / LDAP Directory Connector in Crowd and if you plan to enable automatic user creation, you will also have to set the network.negotiate-auth.delegation-uris property to .yourdomain.com
Google Chrome
In a terminal, go to your user's
Library/Preferences folder and set the
AuthServerWhitelist property to
*.yourdomain.com
defaults write com.google.Chrome AuthServerWhitelist *.yourdomain.com
(Optional) If you did not link your application to an
Active Directory / LDAP Directory Connector in Crowd and if you plan to enable automatic user creation, you will also have to set the
AuthNegotiateDelegateWhitelist property to
*.yourdomain.com
defaults write com.google.Chrome AuthNegotiateDelegateWhitelist *.yourdomain.com

Microsoft Edge
In a terminal, go to your user's
Library/Preferences folder and set the
AuthServerAllowlist property to
*.yourdomain.com
defaults write com.microsoft.Edge AuthServerAllowlist *.yourdomain.com
(Optional) If you did not link your application to an
Active Directory / LDAP Directory Connector in Crowd and if you plan to enable automatic user creation, you will also have to set the
AuthNegotiateDelegateAllowlist property to
*.yourdomain.com
defaults write com.microsoft.Edge AuthNegotiateDelegateAllowlist *.yourdomain.com

Configuration options
crowd.properties
This file is used by IWAAC to connect to the Crowd server.
Warning:
Please note that this file is used by IWAAC and only by IWAAC.
If you want to change Bitbucket's own connection options to the Crowd server, you will need to edit the
bitbucket.properties file in the
shared folder of Bitbucket's home directory. Please check
Atlassian documentation for more details.
Info:
About applying changes to crowd.properties
Edit the file as required, then restart Bitbucket to take the changes into account.
Attributes of the IWAAC crowd.properties file
| Attribute |
Description |
Default Value |
| application.name |
The name of your application as specified in the Crowd server, e.g. bitbucket |
|
| application.password |
The password of your application as specified in the Crowd server |
|
| crowd.base.url |
The URL of the Crowd server, e.g. http://localhost:8095/crowd |
|
| cookie.domain |
Set this property to override the SSO Domain set in the Crowd server, e.g. .internal.cleito.com |
|
| cookie.tokenkey |
The SSO cookie name for this application |
|
| validation_factor.remote_address |
Defines whether the client's or latest proxy's IP address will be used as a validation factor for Crowd SSO tokens |
true |
| validation_factor.x-forwarded-for |
Defines whether the real client's IP address will be used as a validation factor for Crowd SSO tokens |
true |
| http.proxy.host |
The FQDN of the proxy server used to transport REST traffic to the Crowd server, e.g. internal-proxy.cleito.com |
|
| http.proxy.port |
The port of the proxy server used to transport REST traffic to the Crowd server, e.g. 3128 |
|
| http.proxy.username |
The username used to authenticate with the proxy server |
|
| http.proxy.password |
The password used to authenticate with the proxy server |
|
| http.max.connections |
The maximum number of HTTP connections in the connection pool for communication with the Crowd server |
20 |
| http.timeout |
The HTTP connection timeout (milliseconds) used for communication with the Crowd server. A value of zero indicates that there is no connection timeout |
5000 |
iwaac.properties
This file is used by IWAAC to restrict its functions to specific user agents, ip addresses, users or URLs, and to enable fallback to basic authentication.
Info:
About applying changes to iwaac.properties
Edit the file as required, then disable the IWAAC plugin in Bitbucket's administration UI and enable it again to take the changes into account.
Attributes of the iwaac.properties file
| Attribute |
Description |
Available since version |
| iwaac.agent.include.only |
A list of comma separated user agent substrings, e.g. Windows NT, MSIE 11
If this property is not null, then Integrated Windows Authentication will only apply to Active Directory domain users connecting from browsers whose user agent contains at least one of the substrings in the specified list. |
1.1 |
| iwaac.agent.exclude |
A list of comma separated user agent substrings, e.g. iPad, Android
If this property is not null, then Integrated Windows Authentication will not apply to Active Directory domain users connecting from browsers whose user agent contains at least one of the substrings in the specified list. |
1.1 |
| iwaac.ip.include.only |
A list of comma separated IP addresses or IPv4 CIDR notations, e.g. 10.211.55.8,10.211.55.22,10.211.54.0/24
If this property is not null, then Integrated Windows Authentication will only apply to Active Directory domain users connecting from the computers, proxy servers or subnetworks in the specified list. |
1.2 |
| iwaac.ip.exclude |
A list of comma separated IP addresses or IPv4 CIDR notations, e.g. 10.211.55.8,10.211.55.22,10.211.54.0/24
If this property is not null, then Integrated Windows Authentication will not apply to Active Directory domain users connecting from the computers, proxy servers or subnetworks in the specified list.
This is especially useful in a reverse-proxy architecture where internet users have to access to your internal application.
You will also need to set this property when configuring application links between Atlassian products so as to exclude other applications that connect to your instance. |
1.2 |
| iwaac.uri.include.only |
A list of comma separated URI, e.g. /secure,/protected
If this property is not null, then Integrated Windows Authentication will only occur when the Active Directory domain users hit the URI in the specified list. This is especially useful for performance reasons, as by default IWAAC will apply to all URI, which might lead to a lot of connections to the Crowd server. The best practice is to apply Integrated Windows Authentication to the login page only, e.g. /login.action.
Please note that you must not include the context path of your application in the specified values. For instance, if your application base url is http://yourdomain.com/bitbucket, do not set the iwaac.uri.include.only property to /bitbucket/login but to /login. |
1.0 |
| iwaac.uri.exclude |
A list of comma separated URI, e.g. /rest,/api
If this property is not null, then Integrated Windows Authentication will not occur when the Active Directory domain users hit the URI in the specified list. This is especially useful for URI requested by REST or SOAP clients.
Please note that you must not include the context path or your application in the specified values. For instance, if your application base url is http://yourdomain.com/bitbucket, do not set the iwaac.uri.exclude property to /bitbucket/rest but to /rest. |
1.0 |
| iwaac.user.include.only |
A list of comma separated Active Directory usernames, e.g. john_doe,jane_doe
If this property is not null, then Integrated Windows Authentication will only apply to the Active Directory users in the specified list. This is especially useful for testing, as you might want to test IWAAC on a limited set of users before going live. |
1.0 |
| iwaac.user.exclude |
A list of comma separated Active Directory usernames, e.g. john_doe,jane_doe
If this property is not null, then Integrated Windows Authentication will not occur for Active Directory users in the specified list. This is especially useful for administrators who often log onto web applications using different usernames. |
1.0 |
| iwaac.add.user.to.groups |
A list of comma separated Crowd groups, e.g. stash-users,stash-administrators
If this property is not null, then Active Directory domain users will automatically be added to these groups after a successful Kerberos authentication.
Please note that the User Directory in Bitbucket will still have to be synchronized with Crowd's directory before Bitbucket is actually aware of a new group membership. |
1.4 |
| iwaac.fallback.basic.enabled |
Either true or false
When set to true, users connecting from computers outside of the Active Directory domain will be able to enter their Active Directory credentials in a Basic Authentication pop up window.
Please note that you must also complete the 4 next options. |
1.1 |
| iwaac.fallback.basic.dc.hostname |
The fully qualified domain name of your Active Directory Domain Controller, e.g. dc1.cleito.com
It is used by IWAAC to verify users credentials with the LDAP protocol in the case of basic authentication fallback. |
1.1 |
| iwaac.fallback.basic.dc.ssl |
Either true or false
When set to true, IWAAC will use LDAPS to verify users credentials in the case of basic authentication fallback. |
1.1 |
| iwaac.fallback.basic.dc.port |
The LDAP or LDAPS port on your Active Directory Domain Controller, e.g. 389 or 636
Used by IWAAC only in the case of basic authentication fallback. |
1.1 |
| iwaac.fallback.basic.windows.domain |
Your Windows domain name, e.g. CLEITO.COM
Used by IWAAC only in the case of basic authentication fallback. |
1.1 |
| iwaac.fallback.basic.dc.timeout |
The connection timeout (in milliseconds) to your Active Directory Controller, e.g. 1000
Used by IWAAC only in the case of basic authentication fallback. |
1.4 |
| iwaac.auto.create.user.in.crowd.enabled |
Either true or false
When set to true, IWAAC will automatically create successfully authenticated Active Directory domain users in the Crowd directory to which the application is linked. You do not need to use this option if Bitbucket is linked to an Active Directory / LDAP Directory connector in Crowd as in such a case, Active Directory domain users already exist in Crowd.
Please note that the User Directory in Bitbucket will still have to be synchronized with Crowd's directory before Bitbucket is actually aware of a new user creation.
You must also complete the 3 next options if you wish to enable automatic user creation. |
1.4 |
| iwaac.auto.create.user.in.crowd.dc.hostname |
The fully qualified domain name of your Active Directory Domain Controller, e.g. dc1.cleito.com
It is used by IWAAC to get the Active Directory domain user's details (first name, last name, email address) that are required to create the user account in the application's directory in Crowd. |
1.4 |
| iwaac.auto.create.user.in.crowd.dc.ssl |
Either true or false
When set to true, IWAAC will use LDAPS to get the Active Directory domain user's details (first name, last name, email address) that are required to create the user account in the application's directory in Crowd. |
1.4 |
| iwaac.auto.create.user.in.crowd.dc.port |
The LDAP or LDAPS port on your Active Directory Domain Controller, e.g. 389 or 636
Used by IWAAC to get the Active Directory domain user's details (first name, last name, email address) that are required to create the user account in the application's directory in Crowd. |
1.4 |
| iwaac.auto.create.user.in.crowd.timeout |
The connection timeout (in milliseconds) to your Active Directory Controller, e.g. 1000
Used by IWAAC to get the Active Directory domain user's details (first name, last name, email address) that are required to create the user account in the application's directory in Crowd. |
1.4 |
| iwaac.auto.create.user.in.crowd.password.min.length |
The minimum length for the random password of the user account to be created in the application's directory in Crowd, e.g. 8
Used by IWAAC only in the case of automatic user creation. |
1.4 |
| iwaac.auto.create.user.in.crowd.password.max.length |
The maximum length for the random password of the user account to be created in the application's directory in Crowd, e.g. 16
Used by IWAAC only in the case of automatic user creation. |
1.4 |
| iwaac.auto.create.user.in.crowd.password.min.upper.alpha |
The minimum number of uppercase alphabetic characters for the random password of the user account to be created in the application's directory in Crowd, e.g. 1
Used by IWAAC only in the case of automatic user creation. |
1.4 |
| iwaac.auto.create.user.in.crowd.password.min.lower.alpha |
The minimum number of lowercase alphabetic characters for the random password of the user account to be created in the application's directory in Crowd, e.g. 1
Used by IWAAC only in the case of automatic user creation. |
1.4 |
| iwaac.auto.create.user.in.crowd.password.min.numeric |
The minimum number of numeric characters for the random password of the user account to be created in the application's directory in Crowd, e.g. 1
Used by IWAAC only in the case of automatic user creation. |
1.4 |
| iwaac.auto.create.user.in.crowd.password.min.special |
The minimum number of special characters for the random password of the user account to be created in the application's directory in Crowd, e.g. 1
Used by IWAAC only in the case of automatic user creation. |
1.4 |
Tuning for production
This section lists recommended configuration values that you might want to set in
iwaac.properties. These values have been tested on recent versions of Bitbucket. You should nevertheless keep in mind that there might be slight differences to apply on specific other versions.
# Tested on Atlassian Bitbucket 7.0.1
iwaac.uri.include.only /login
Info:
What if you enabled fallback to basic authentication?
If you enabled fallback to basic authentication, you will have to leave the iwaac.uri.include.only property blank. The reason is that, in the case of fallback to basic authentication, the browser will send the user's credentials on every request and these special data have to be filtered otherwise this could mess up Bitbucket's behaviour.
Failover
Cleito IWAAC can be configured so as to provide your applications with a failover mechanism when your main Active Directory Domain Controller is down.
Edit
krb5.conf in your
iwaac.home directory and add another
kdc property:
[realms]
YOURDOMAIN.COM = {
kdc = dc1.yourdomain.com:88
kdc = dc2.yourdomain.com:88
default_domain = .yourdomain.com
}
Also edit
iwaac.properties and add domain controllers as a list of comma separated values:
iwaac.fallback.basic.dc.hostname dc1.yourdomain.com, dc2.yourdomain.com
iwaac.auto.create.user.in.crowd.dc.hostname dc1.yourdomain.com, dc2.yourdomain.com
Upgrading
- If you need to upgrade Cleito IWAAC from version 2.x to 2.2, go to the Add-ons > Manage add-ons section in Bitbucket's administration UI then select IWAAC Kerberos SSO and click on Uninstall. Then click on Upload add-on and select the CLEITO-IWAAC-PLUGIN-2.2.0.jar file from the lib folder of the Cleito IWAAC archive.
- If you need to upgrade Cleito IWAAC from version 1.x to 2.2, you can choose the classic upgrade process and replace CLEITO-IWAAC-1.x.jar with CLEITO-IWAAC-2.2.0.jar in Tomcat's lib directory and restart Tomcat (for Bitbucket versions prior to 5.0 only). Please refer to the documentation dedicated to Tomcat-based applications for more details.
If you prefer to upgrade to the standard add-on installation mode, please follow these steps:
- Stop Bitbucket/Tomcat (for Bitbucket versions prior to 5.0)
- Remove IWAAC's Valve element from conf/server.xml (for Bitbucket versions prior to 5.0)
- Delete the CLEITO-IWAAC-1.x.jar file in Tomcat's lib directory (for Bitbucket versions prior to 5.0)
- Remove iwaac's logging property from conf/logging.properties (if any, for Bitbucket versions prior to 5.0)
- Remove the setup.sh and setup.bat scripts from conf/IWAAC (for Bitbucket versions prior to 5.0)
- Move/copy your IWAAC configuration files (jaas.conf, krb5.conf, crowd.properties, iwaac.properties) and your keytab to the folder you would like the plugin to use. Edit jaas.conf and adapt the path of the keyTab attribute accordingly.
- Create a file named iwaac-init.properties in atlassian-bitbucket/WEB-INF/classes or app/WEB-INF/classes. This file must contain only one property named iwaac.home. Set its value to the absolute path of the folder that contains your IWAAC configuration, for instance /opt/bitbucket/atlassian-bitbucket-7.0.1/IWAAC
- Restart Bitbucket
- Go to the Add-ons > Manage add-ons section in Bitbucket's administration UI and upload CLEITO-IWAAC-PLUGIN-2.2.0.jar
- If you need to upgrade Bitbucket, please make sure to copy the atlassian-bitbucket/WEB-INF/classes/iwaac-init.properties or app/WEB-INF/classes/iwaac-init.properties file of your current Bitbucket instance to the atlassian-bitbucket/WEB-INF/classes or app/WEB-INF/classes directory of your target instance. Then edit this file and make sure that the iwaac.home property is pointing to the right directory.
Entering license key
- Go to your iwaac.home directory and copy/paste your license key into the iwaac.license file
- Restart Bitbucket
Troubleshooting and problem resolution
Warning:
Emergency mode
If you can't access to Bitbucket's administration UI anymore (for instance because your browser keeps getting a basic authentication pop-up), you can always disable the plugin from outside the administration UI by commenting or deleting the iwaac.home property in atlassian-bitbucket/WEB-INF/classes/iwaac-init.properties or app/WEB-INF/classes/iwaac-init.properties and then restarting Bitbucket.
For Bitbucket versions prior to 5.0, whatever your problem, please turn on DEBUG logging in the
atlassian-bitbucket/WEB-INF/classes/log4j.properties file of your Bitbucket instance. Insert the following line at the end of the file and restart Bitbucket:
log4j.logger.com.cleito.iwaac.plugin = DEBUG
For Bitbucket versions starting from 5.0, whatever your problem, please turn on DEBUG logging in the
shared/bitbucket.properties file of Bitbucket's home directory. Insert the following line at the end of the file and restart Bitbucket:
logging.logger.com.cleito.iwaac.plugin=DEBUG
IWAAC events will be logged into the
log/atlassian-bitbucket.log file of your Bitbucket home directory. They are all prefixed by the
[IWAAC] string so you can easily parse the generated log file. When you have solved your problem, you can turn logging to the INFO level.
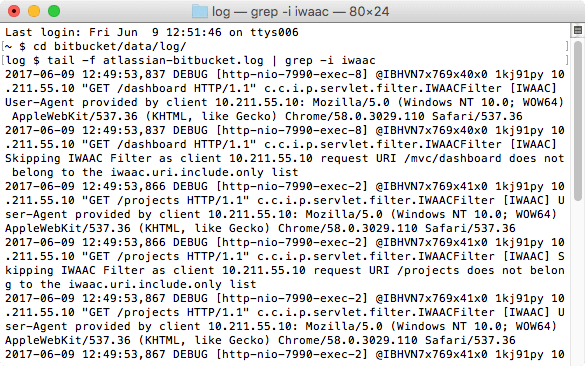
You can also turn on debug logging for Kerberos specific events.
Edit
jaas.conf in your
iwaac.home directory:
debug=true;
For Bitbucket versions prior to 5.0, also edit
bin/setenv.sh (Linux, Mac OS) or
bin/setenv.bat (Windows) and insert the following line at the beginning of the file. Then restart Bitbucket.
On Linux or Mac OS:
JAVA_OPTS="-Dsun.security.krb5.debug=true $JAVA_OPTS"
On Windows:
set JAVA_OPTS=%JAVA_OPTS% -Dsun.security.krb5.debug=true
Kerberos debug logs will appear in the
logs/catalina.out file of your Bitbucket instance. Please note that they are
not prefixed by the
[IWAAC] string.
For Bitbucket versions starting from 5.0, edit the
shared/bitbucket.properties file of Bitbucket's home directory and insert the following line at the end of the file. Then restart Bitbucket.
logging.logger.sun.security.krb5=DEBUG
Kerberos debug logs will appear in the
log/launcher.log file of your Bitbucket instance. Please note that they are
not prefixed by the
[IWAAC] string.

Common problems
A Basic Authentication popup appears
 Most likely cause:
 your web browser has not been configured for automatic Kerberos authentication or you did not use the A record of your Bitbucket server throughout the installation process.
Resolution: follow the
browser configuration instructions or start the configuration again with the A record of your Bitbucket server.
DEBUG: [IWAAC] No valid credentials provided(Mechanism level: Attempt to obtain new ACCEPT credentials failed!)
Caused by: javax.security.auth.login.LoginException: No LoginModule found for com.sun.security.auth.module.Krb5LoginModule
Most likely cause: you are running JDK 11, which requires to set a specific system property.
Resolution: in such a situation, edit
bin/_start-webapp.sh (Linux, Mac OS) or
bin/_start-webapp.bat (Windows) and insert the following at the beginning of the file. Then restart Bitbucket.
On Linux or Mac OS:
#!/usr/bin/env bash

JAVA_OPTS="-Datlassian.org.osgi.framework.bootdelegation.extra=sun.*,com.sun.* $JAVA_OPTS"
On Windows:
@echo off

set JAVA_OPTS=%JAVA_OPTS% -Datlassian.org.osgi.framework.bootdelegation.extra=sun.*,com.sun.*
DEBUG: [IWAAC] No valid credentials provided(Mechanism level: Attempt to obtain new ACCEPT credentials failed!)
Caused by: javax.security.auth.login.LoginException: Message stream modified (41)
Most likely cause: a
change in the OpenJDK Kerberos client has been introduced in OpenJDK 1.8.0_242 and above, which requires to set a specific system property if you face that error message.
Resolution: edit
bin/_start-webapp.sh (Linux, Mac OS) or
bin/_start-webapp.bat (Windows) and insert the following at the beginning of the file. Then restart Bitbucket.
On Linux or Mac OS:
#!/usr/bin/env bash

JAVA_OPTS="-Dsun.security.krb5.disableReferrals=true $JAVA_OPTS"
On Windows:
@echo off

set JAVA_OPTS=%JAVA_OPTS% -Dsun.security.krb5.disableReferrals=true
ERROR: [IWAAC] GSSContext Target Name (service ticket) is null
Most likely cause: there is a
known bug in JDK 1.8.0_40 and JDK 1.8.0_45 that prevents Kerberos authentication to succeed on Linux and Mac OS environments. This may also happen if you are trying to access to Bitbucket from the server or workstation on which it is installed.
Resolution: upgrade your JDK version or connect to Bitbucket from another computer.
ERROR: [IWAAC] Service ticket could not be decrypted, exception is: Failure unspecified at GSS-API level (Mechanism level: Clock skew too great (37))
Most likely cause: there is a time desynchronization between your Bitbucket server and the Active Directory controller.
Resolution: time synch your servers with NTP.
DEBUG: [IWAAC] Unexpected end of file from server
Most likely cause: that exception might occur when using a proxy between IWAAC and the Crowd server. Some proxies actually do not handle persistent connections (
keep alive) correctly.
Resolution: in such a situation, for Bitbucket versions prior to 5.0 disable
keep alive in
bin/setenv.sh (Mac OS, Linux) or
bin/setenv.bat (Windows) and restart Bitbucket. For Bitbucket versions starting from 5.0, disable
keep alive in
bin/_start-webapp.sh (Mac OS, Linux) or
bin/_start-webapp.bat (Windows) and restart Bitbucket.
On Linux or Mac OS:
JAVA_OPTS="-Dhttp.keepAlive=false $JAVA_OPTS"
On Windows:
set JAVA_OPTS=%JAVA_OPTS% -Dhttp.keepAlive=false
DEBUG: [IWAAC] Read timed out
Most likely cause: that exception might occur when using a proxy between IWAAC and the Crowd server. Some proxies actually do not handle persistent connections (
keep alive) correctly.
Resolution: in such a situation, for Bitbucket versions prior to 5.0 disable
keep alive in
bin/setenv.sh (Mac OS, Linux) or
bin/setenv.bat (Windows) and restart Bitbucket. For Bitbucket versions starting from 5.0, disable
keep alive in
bin/_start-webapp.sh (Mac OS, Linux) or
bin/_start-webapp.bat (Windows) and restart Bitbucket.
On Linux or Mac OS:
JAVA_OPTS="-Dhttp.keepAlive=false $JAVA_OPTS"
On Windows:
set JAVA_OPTS=%JAVA_OPTS% -Dhttp.keepAlive=false
SEVERE: org.apache.coyote.http11.Http11Processor.service Error processing request
java.lang.IllegalArgumentException: An invalid domain [.yourdomain.com] was specified for this cookie
Most likely cause: Some versions of Tomcat embed a
Cookie Processor Component that is not fully compliant with
RFC 6265 and throws an exception when the IWAAC plugin tries to set a Crowd SSO cookie on a domain whose name starts with "." (e.g.
.yourdomain.com)
Resolution: remove the leading "." character from the
SSO domain value in the
Administration > General Options of your Crowd server. For instance
yourdomain.com instead of
.yourdomain.com. Then, restart your Bitbucket server.
Other issues
Support:
Do not remain stuck with a configuration issue
Feel free to contact us at
support@cleito.com


 IWAAC Kerberos SSO Setup


 Most likely cause: your web browser has not been configured for automatic Kerberos authentication or you did not use the A record of your Bitbucket server throughout the installation process.